A blog button is your business card in the bloggy world. Its what you give to other people to direct them to your site. Kinda like handing out business cards. Its can be very valuable to have a button that is appealing, unique and reflects your style. The more noticeable your button, the more likely people are to click it to visit your site.
There are a few things that you need before you start your button.
1. A design program or website – I use Photoshop, but before I had it I used PowerPoint (yes, really) and it worked great. You can also use sites like PicMonkey and Pixlr Express that allow you to create, update and beautify any picture.
2. Graphics and fonts – There are a ton of sites that offer free graphics and fonts for personal use. Some of my favorite places are:
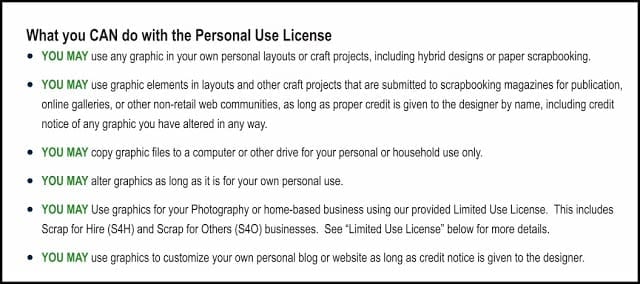
I have personally downloaded from each of the sites and they are great. Most graphics and fonts you download allow for personal use on your blog. DOUBLE CHECK!
3. A host site – Photobucket or Picasa work great.
4. HTML coding – Dont worry, Ill walk you through this part. I have a sneaky cheater version of HTML.
Ok, lets get started.
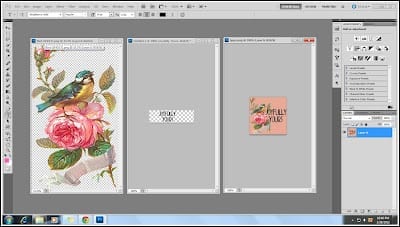
To demonstrate, I created a button for my friend Tygre over at Joyfully Yours. Her button consists of three layers, the background, the graphic and the font.
Buttons can be any shape or size. I made this one a 150×150 square. This is a simple button so I just layered the picture and wording over the background. Save and done.
Once you have your button, upload it to your host site. I use Photobucket and it works great. For the coding of the button you will need either the ‘Direct Link’ information or the ‘HTML code’. If you know how to use HTML, then more power to ya! Its a foreign language to me so I found a sneaky way of creating the grab box code.
“Grab My Button” Code Generator is my go to website for grab boxes. Its simple to use, free, and best of all I dont have to do any HTML coding!
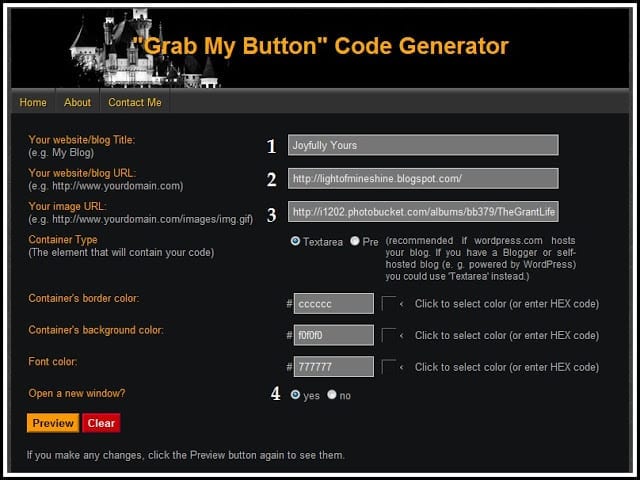
To make the code it asks for:
1. Your website/blog Title
2. Your URL
3. Your image URL (found on your host site)
4. I suggest opening in a new window so that people are not directed away from the original site.
It allows you to preview your button and then generates your HTML code. Copy all the HTML jargon and put it in a new gadget on your blog.
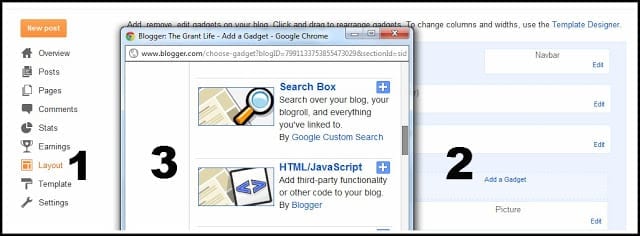
To do this, go to Layout > Add a Gadget > HTML/Java. Paste your code in, preview and save. (Im sure most people know how to do this part, but just in case you needed a little visual.) Simple, right?
Now get out there and make yourself an awesome button! Or, if you’d like me to create one for you shoot me an email. Id love to create something for ya!
—
Do you have any blogger questions? Email me at thegrantlife(at)yahoo(dot)com.
Latest posts by Kelley (see all)
- Homemade Salisbury Steak - November 23, 2025
- Easy Hot Cocoa Dip - November 13, 2025
- Peppermint mocha syrup - November 12, 2025







Liz says
Such good info! I wish I had known all this when I was first starting out — I had lots of trial and error before I figured it out! Thanks for sharing! 🙂
Theresa says
This would have saved me so much time and frustration when I was first staring out. Great information!
Jessica says
So much useful info! That website is amazing, I can't believe I didn't know of it before.
Jessica
stayathomeista.com
(see how I'm using a link in my signature? It's all because of you!)
Erin Alldredge says
Okay. I looked and looked and looked for a website or widget that would help be make the code for a blog button. I couldn't find one. I copy and pasted code from blog tutorials but I went through 4 or 5 and none of them worked quite right. I had to painfully figure out the code make it myself. Where was this code generator when I needed it? AND power point works great to make simple banners and buttons. I still used power point to design stuff for my blog.
Tygre Caley says
Great information, Kelley! I'm excited to give it a try! Tons of thanks for making a button for a blogging newbie 😉
Renonda says
Thanks for another great and helpful post!
Holly says
I've been wanting to learn about buttons– thanks for this very useful post! I'll let you know when I make one and post it to my blog. Many thanks!
Allyson says
This is such a great post! Thanks for all the great tips.
Allyson
http://cupcakescandycanes.blogspot.com
MiMi says
That is the ONE thing I never learned how to do. 🙂
--Amie-- says
Kelley, you ROCK!!! 🙂 I've been wondering for ages how I could make my own without having to pay someone to do it! Thanks a million!
Delle says
Oh thank you, thank you!!! I've been wondering how to make a button – now I can get to work on it!!!
Rachel says
Awesome! I am going to try to make a button this week! 🙂
Bucket Elevators says
Blog Buttons (or badges) are becoming a very popular way to promote, track and link back to your blog. Here is a short tutorial on how to make your own blog button. These steps should be pretty easy to follow and they are only for those blogs who use blogger.
Jill says
That is great info!! I wish I had something like this when starting out! I figured it out all on my own. It was very hard! Thanks for sharing at Thursday's Temptation.
Jill
Stacia says
I just fell upon your blog and your tutorial! THANK YOU!!! Now, I am not frustrated and my button pages looks fabulous! Looking forward to promoting my blow now, and am a follower!
Thanks again for the awesome info 🙂
Jeannie says
Love this series! I appreciate bloggers who share what they know for the rest of us to use!!